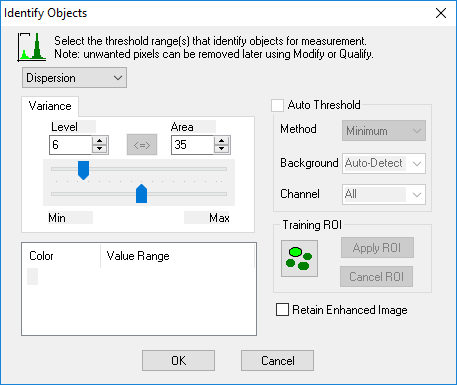
The Dispersion method of identification detects objects of interest based on the amount of structural variation within a given area. By adjusting the level of variation and the size of the specified area, complex structures can be identified in images where the background would otherwise have prevented this using thresholding techniques. This method of object identification is ideal when working with monochrome images, especially those acquired using DIC and phase contrast observation methods. Dispersion can also be used to detect objects in color images, the color image is treated as monochrome for the identification process.

Object pixels are displayed in a green or silver overlay. Use the transparency slider on the toolbar to make the solid overlay transparent. The goal is to create an overlay covering the object pixels targeted for measurement.
This sections provides a detailed description for all of the available features in the Identify Dialog when Dispersion has been selected. Please note that some features are only available when using a thresholding method of object identification, these features will appear grayed out and are not included in the descriptions below.
Level represents the degree of structural variation within a given area. Level values range from 1 to 32, with 1 indicating a more uniform structure with little to no variation and 32 having the most variation.
Area represents the number of pixels that are included in the immediate area. The minimum area is 4 pixels and the maximum area is 64 pixels.
The Training ROI is very effective in identifying objects of interest based on a set of criteria. Click the Training ROI icon, select a shape and outline several ROIs within an area to identify. Click the Training ROI icon and the software will identify objects based on the intensity ranges for the object(s) and apply them to the entire image. If the identification range is not quite correct, fine adjustments can be made by using the slider controls. If the ranges are not good, use the Training icon again. Be careful not to include any of the background intensities, as the automatically sampled ranges will include the background values as well as the object, which will not give an accurate identification.
When this checkbox option is selected and a Workfile is being executed, an interactive Identify Dialog will pop-up. This allows the operator to check and correct the level and area values for the particular image during execution. The preset values are applied and changes to these values are saved to the workfile when the OK button is used to exit the dialog.
This option can be used to start a Scan with interactive supervision of the Identify values, and then checked off when it is clear that the values are stable and do not need to be changed anymore. If Identify is found to give a poor binary image, the Workfile execution can be interrupted, and the Runtime Menu turned on to regain control.
This checkbox controls which image is displayed during data collection. If the box is checked, the resulting image after the Enhance operations have been completed is retained on display for operation on by subsequent workfile operations. If this option is not selected (the default), the original image of the sample will be recalled when the object measurements and statistics are on display.
The OK button will save the options in the Workfile being created or changed, and exit the Dialog.
The Cancel button will recall the options selected from before this Dialog was opened, canceling any changes and exit.